
 Thank you all who commented and gave a go on the guessing game on my previous post. The correct answer is Makeup Revolutions. So I can already feel that this is going to be a long post. I am going first do a review and give a few tips and then show you how I used the product! Aren’t you guys lucky haha 😀
First of all, I picked this product up on Monday ;from Superdrugs for £6. It literally feels like the biggest bargain in the world as you get 8 concealers!!! You can get this product in light , medium and dark. I got light ,this was because I wanted to use it for a light cream highlighter under my eyes. I think this is a great dupe for the light shades in the Anastasia Beverly Hills cream contour kit!
 You have 8 colours to play around with ,which means you can really find the perfect colour for under your eyes and cheekbones.
Secondly, I’d like to say that I would not recommend this as an under eye correct and concealer as all the colours are light; this will give you that ashy grey look. So , I would begin by correcting and concealing my eyes .
I have to give it to Makeup Revolution , as soon as I put my fingers on the colours my fingers melt into it, their so creamy and blendable! I honestly love that about them. Also, you get so much product!!!!!! Who needs high end products!? HEY
Another point, if you have dry skin like me, using this product alone will really highlight them areas on your face ; not good. To overcome this, really moisturise your face and for extra guarantee add a bit of oil with the creams so the dry patches don’t show up. However , if you have oily or combination skin this won’t be a problem.
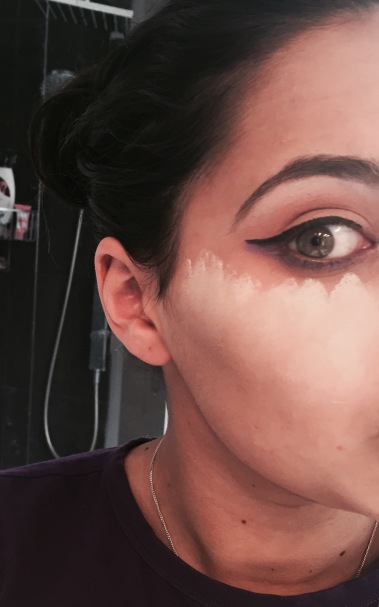 Lets get on to the tutorial. Firstly, as you can see I got my wet beauty blender sponge and swirled it around into 3 shades of colour. The great thing about this palette , you can literally use any of the colours so create the light look. I then dabbed it on to my face, creating a triangle on my cheek.
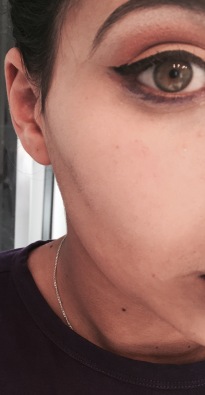
As you can see it looks really light, perfect. I then blended it all in using my blender!

Just another angle haha. Next, I used my Bobbi Brown sheer press powder , in the shade sand and powdered that on and buffed it all in. In the picture below , I look a bit ghostly; kind of scary!

After this , I NEEDED to add some colour to my face ,So I used my sleek contour kit in medium. I contoured my cheeks, forehead , jaw and nose. I then, added some of the sleek highlighter to my cheeks to make them glisten.
Below, you can see the many photos that I took on my phone ; some with flash and some without , where you can see the affect of contouring in natural light.. Excuse my dodgy wing eyeliner, the beauty blender smudged it.


Hope you enjoyed , loves xox


![FullSizeRender[1]](https://jasminetailorbeautyaddict.wordpress.com/wp-content/uploads/2015/04/fullsizerender1.jpg)
![FullSizeRender[2]](https://jasminetailorbeautyaddict.wordpress.com/wp-content/uploads/2015/04/fullsizerender4.jpg)
![FullSizeRender[1]](https://jasminetailorbeautyaddict.wordpress.com/wp-content/uploads/2015/04/fullsizerender11.jpg)
![FullSizeRender[1]](https://jasminetailorbeautyaddict.wordpress.com/wp-content/uploads/2015/04/fullsizerender12.jpg?w=382&h=239)

